Most Vietnam e-visa applications that run into trouble are not rejected for eligibility reasons. They are rejected because of a bad passport scan or a non-compliant portrait photo.
The frustrating part is that these errors are entirely preventable. The requirements are specific, but they are not complicated once you know what the system expects. This guide walks through the exact passport scan and photo specifications for a Vietnam e-visa, then breaks down the seven most common upload errors travelers make and how to avoid every one of them.
What You Actually Need to Upload
The Vietnam e-visa application requires two separate image uploads. Confusing them, swapping them, or uploading the wrong one in the wrong field is itself one of the most common mistakes. Here is what each upload is and why the system needs both.
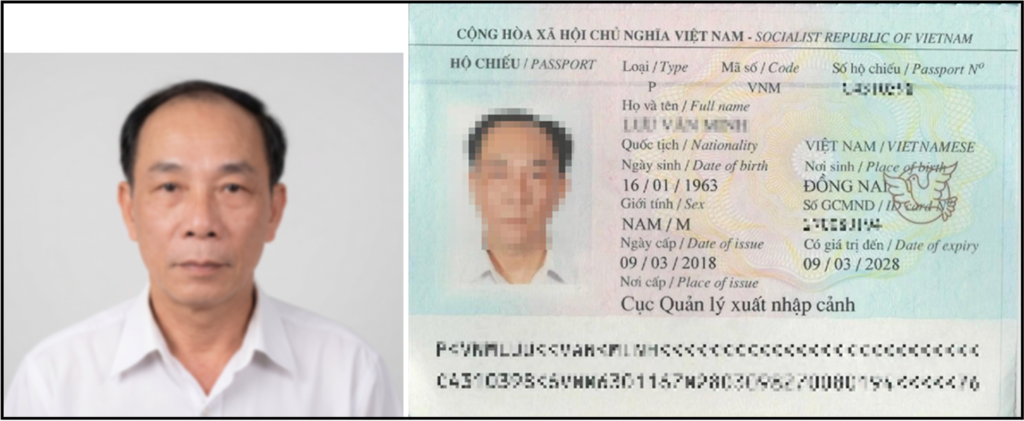
Portrait Photo (Your Face)
This is a passport-style headshot. It must show your full face and upper shoulders against a plain white background. It needs to be recent (taken within the last six months), unedited, and free of accessories like hats, glasses, or scarves. For full details on dimensions, resolution, background colour, and every other specification, see the Vietnam E-Visa Photo Requirements (2026) guide on the evisas vietnam blog.
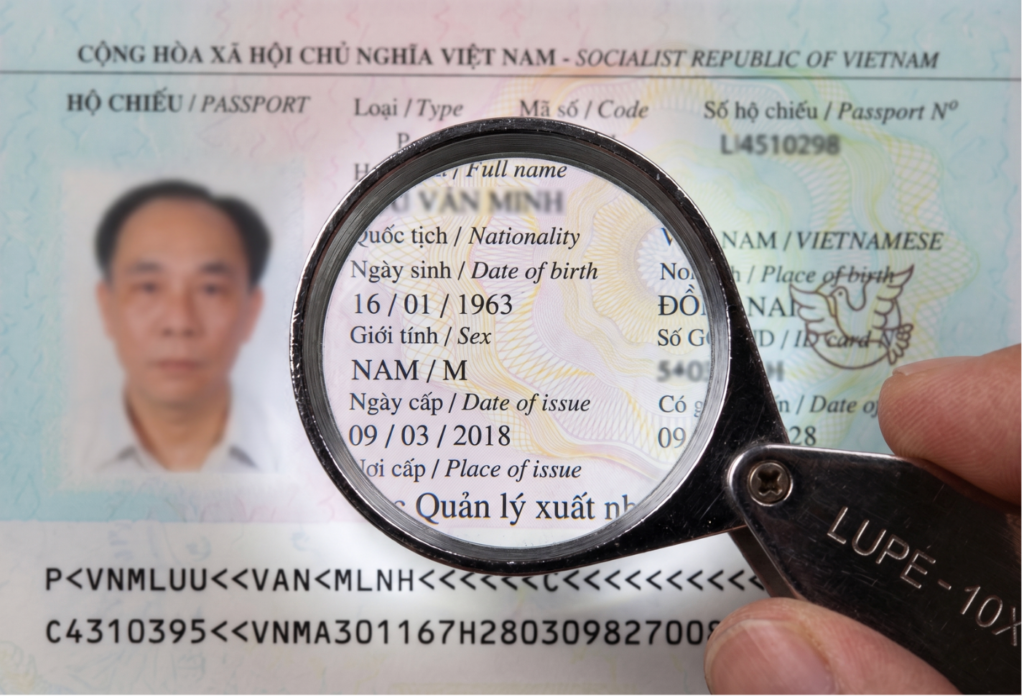
Passport Bio Page Scan (Your Data Page)
This is a scan or photograph of the information page inside your passport. It shows your name, nationality, date of birth, passport number, expiry date, and the two machine-readable lines at the bottom (called ICAO lines). The application system uses optical character recognition (OCR) to read this page and auto-fill your form data. That means the quality of this scan directly affects the accuracy of your entire application.
Exact Technical Specifications
Before uploading anything, check your files against this table. Every requirement listed here has caused real rejections when missed.
| Requirement | Portrait Photo | Passport Bio Page | Why It Matters |
| File format | JPG / JPEG only | JPG / JPEG only | PNG, HEIC, and PDF uploads are rejected outright |
| Max file size | Approximately 1 MB | Approximately 2 MB | Oversized files fail to upload or time out |
| Background | White, plain, no patterns | N/A (full page visible) | Coloured backgrounds trigger rejection |
| What must be visible | Full face, upper shoulders, neutral expression | Entire page including both ICAO machine-readable lines | Missing elements cause auto-detection failures |
| Recency / validity | Taken within the last 6 months | Current, unexpired passport | Outdated images create mismatches that flag the applicaIttion |
Pro Tip: If your phone camera defaults to HEIC format (common on iPhones), change the setting to JPG before taking your photos. You can find this under Settings > Camera > Formats > Most Compatible. This saves you from having to convert the file later.
The 5 Most Common Passport Scan Errors (and How to Avoid Each One)
1. Glare or Reflection on the Passport Page
This is the single most reported upload issue. When you photograph your passport with a phone, the flash bounces off the laminated surface and creates a white glare across the text. Even a small reflection can obscure characters that the OCR system needs to read. If the system cannot parse a letter or digit, it either auto-fills incorrectly or rejects the scan outright.
How to fix it: Turn off your flash. Use natural daylight or a well-lit room with indirect light. Place the passport flat on a dark, non-reflective surface. Hold your phone directly above, parallel to the page, to avoid angled reflections.
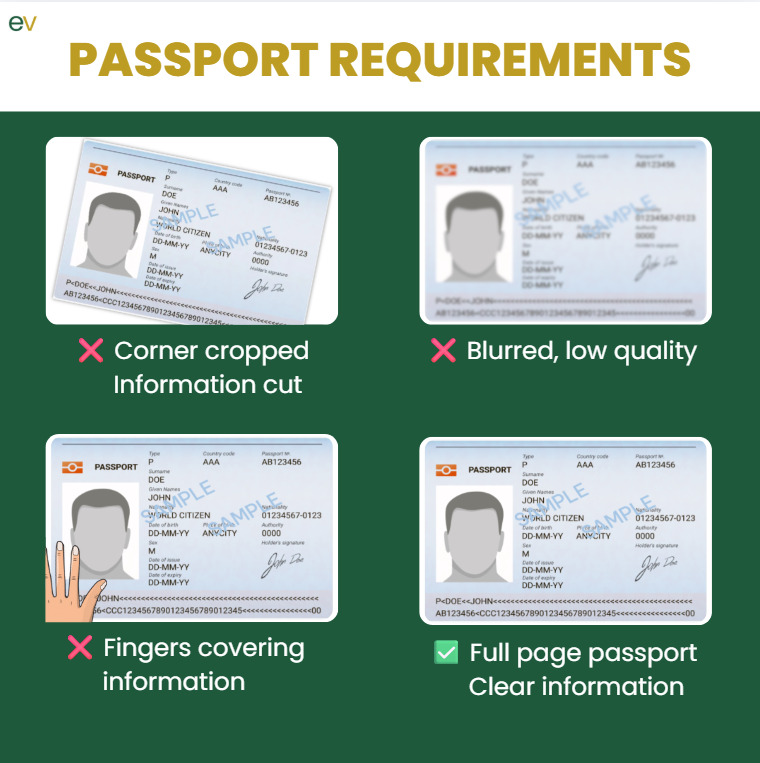
2. Cropped or Tilted Bio Page Missing the ICAO Lines
The two machine-readable lines at the very bottom of your passport bio page (the rows of chevrons, letters, and numbers) are critical. They are what the OCR system reads first. If your scan is tilted, or if the bottom edge of the page is cut off even slightly, those ICAO lines may be incomplete. The system will reject the image with a message like “Passport data page image incorrect” or simply fail to auto-fill your details.
How to fix it: Frame the entire page with a visible margin on all four sides. Do not crop tightly around the text. Lay the passport completely flat and hold the camera steady, directly overhead. Check the image before uploading and zoom in on the bottom edge to confirm both ICAO lines are fully visible.
3. Wrong File Format (PNG, HEIC, or PDF instead of JPG)
The application portal only accepts JPG or JPEG files. Screenshots save as PNG. Apple devices often default to HEIC. Scanned documents frequently save as PDF. Any of these formats will be rejected at the upload step, sometimes with an unhelpful error message that does not explain why.
How to fix it: Before uploading, check the file extension. If it is not .jpg or .jpeg, convert it. On most devices you can open the image, take a screenshot, and save as JPG, or use a free online converter. Better yet, set your phone camera to save in JPG format from the start (see the Pro Tip above).
4. Blurry or Pixelated Images
Shaky hands, low-resolution cameras, or heavy zoom and crop can produce images where the text is not sharp enough for the OCR system to read. Even if the image looks acceptable on your phone screen, the system processes it at a much finer level. Characters like “0” and “O”, or “1” and “I”, become indistinguishable in a slightly blurry scan.
How to fix it: Rest your phone on a stable surface or use a scanner app that auto-detects page edges and corrects perspective. Make sure the entire bio page is in focus. Avoid zooming in or cropping the original image down. If the result still looks soft, retake the photo in better lighting.
5. Portrait Photo with a Coloured or Busy Background
Selfies taken in a living room, at a cafe, or against a patterned wall will be rejected. The portrait photo requires a plain white background with no other objects, shadows, or people visible. Even a light grey or off-white wall may not pass if the contrast is not clean enough.
How to fix it: Stand directly in front of a plain white wall. Use even, front-facing light so there are no shadows behind you. Ask someone else to take the photo if possible, so you can stand naturally with both shoulders square to the camera. Do not use beauty filters or any editing software.
The Step Most People Skip: Checking the Auto-Filled Data
After you upload your passport bio page, the system uses OCR to extract your personal details and auto-fill the application form. This includes your full name, passport number, nationality, date of birth, and expiry date. The process saves time, but it is not perfect.
OCR misreads happen more often than most travelers realise. Common errors include:
- Letter-number swaps: “0” (zero) read as “O” (letter), “1” read as “I” or “l”
- Accented characters dropped: Names with diacritics (e.g., Muller instead of Müller) may lose their special characters
- Date format confusion: The system may misinterpret DD/MM/YYYY as MM/DD/YYYY or vice versa
- Hyphenated or multi-part names: Spaces or hyphens may be dropped, merged, or misplaced
If you submit without catching these errors, the data on your e-visa will not match your passport. That mismatch can cause problems at immigration, delay your approval, or require you to reapply entirely.
Quick Checklist Before You Upload
Run through this list right before you hit submit. If any item fails, fix it first.
- Both files are in JPG or JPEG format (not PNG, HEIC, or PDF)
- Portrait photo has a plain white background, no shadows, no accessories
- Portrait was taken within the last 6 months and is unedited
- Your full face and upper shoulders are visible, with a neutral expression
- Passport bio page scan shows the entire page, including all four edges
- Both ICAO machine-readable lines at the bottom are fully visible and not cut off
- No glare, reflection, or shadow on the passport page
- The image is sharp and in focus, with all text clearly legible
- File sizes are within limits (portrait under 1 MB, bio page under 2 MB)
- All auto-filled form data has been reviewed and matches your passport exactly
What Happens If Your Scan Gets Rejected?
A rejection for a passport scan issue is not a visa denial
The challenge is that rejection notices do not always explain the specific problem clearly. You may receive a generic message that says the image is “incorrect” or “does not meet requirements” without telling you whether the issue was glare, cropping, file format, or something else. That ambiguity is what leads many travelers to resubmit the same flawed image multiple times.
If you want to avoid this cycle entirely, a service like evisas vietnam reviews every application and its supporting documents before submission. We will check scan quality, file format, image framing, and data accuracy, catching the kinds of errors that automated systems flag but do not explain.
Get Your Application Right the First Time
Passport scan errors are the most common reason Vietnam e-visa applications hit unnecessary delays. The requirements are clear, but it only takes one missed detail to trigger a rejection and restart the process.
evisas vietnam‘s team reviews every application and its supporting documents before submission, checking scan quality, file compliance, data accuracy, and form completeness. If something is wrong, they catch it before the system does.
Start your Vietnam e-visa application with evisas vietnam.
All e-visas are issued by the Vietnam Immigration Department. evisas vietnam is a private consultancy that provides application support and document review services.
Related Guides on the evisas vietnam Blog
If you are preparing your Vietnam e-visa application, these guides cover the other areas where travelers commonly run into trouble:
- Vietnam E-Visa Photo Requirements (2026): The Complete Guide – Full specifications for the portrait photo, including dimensions, background, expression, and what to avoid.
- Vietnam Visa on Arrival vs. E-Visa (2026) – A side-by-side comparison if you have not decided which visa type fits your trip.
- Vietnam’s 90-Day Multiple Entry E-Visa: How Does It Work? – Useful if you plan to leave and re-enter Vietnam during your stay.
- Single vs. Multiple Entry Vietnam E-Visa: Which One Do You Need? – Breaks down the cost, flexibility, and common pitfalls of each entry type.
- Vietnam Visa Exemption List (2026) – Check whether your nationality qualifies for visa-free entry before applying.
- Emergency Vietnam E-Visa Guide – Options for last-minute processing when your departure is days away.